This topic contains 30 replies, has 8 voices, and was last updated by ![]() Guy Paquin 2 years, 11 months ago.
Guy Paquin 2 years, 11 months ago.
-
AuthorPosts
-
November 23, 2014 at 12:10 pm #10089
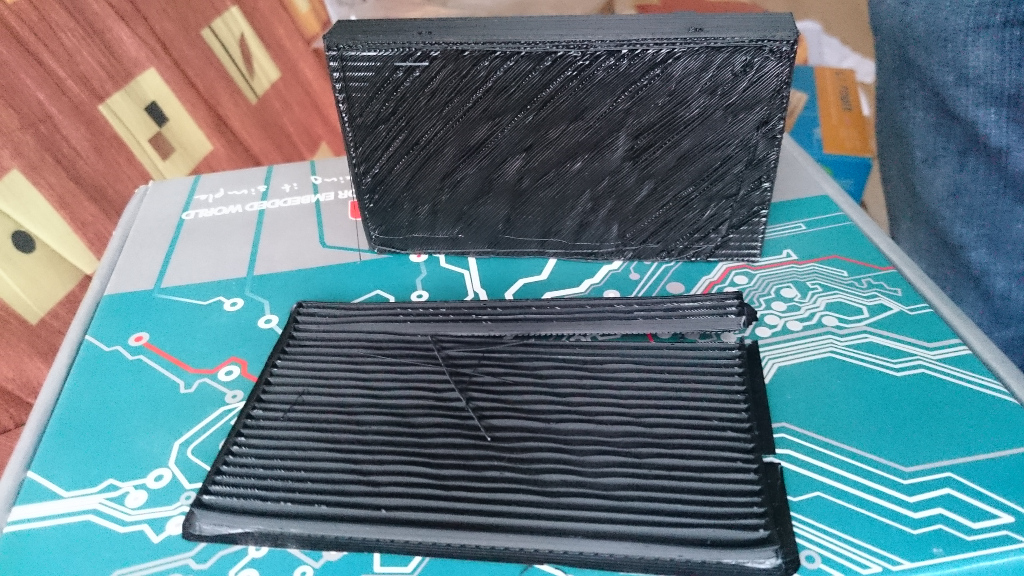
One of the reasons I got 3D printer was to be able to print various cases for my electronic projects. So I made modular design of Raspberry Pi case with HD. It relies on three pieces being printed with long flat surface and then I learnt about ABS wrapage. Corners of such edges are susceptible of wrapping upwards. Also, whole case (middle part of it for me) wrapped slightly upwards as well. Needing three to line up - that would really look ugly and probably not work as they won’t align properly. (ABS is green on the images)
So, PLA should have been better. I printed the same part again with PLA (white on the images) just to get around the issue. I expected PLA being more rigid (less flexible) to be a downside as I designed little clips but that’s different story. Anyway - PLA (CEL’s Polar White) actually wrapped far more! (circled in red on pictures)

Continuing to try to work on solution I loaded black ABS and after reading that rafts could sort out wrapage as only they are on the bed and heated to 115ºC and after encouraged by @miffmaster ‘s <span class=”bbp-breadcrumb-current”>Bridges! How to make them work</span> I dug deeper in profiles and found:
raft_layers = 0
line I set it to 25 (0.2mm x 25 = 5mm) and printed another part of the case. Mistake I made, I think, was that I was supposed to add
support_material_interface_layers = 2
(which is not in ordinary Robox’s profiles by default) and it sliced it without any interface layers. Also, it looks I hit a bug in Slic3r (re-curing bug - already fixed and reappeared) that adds distance of 3 to 4 layers before printing first real layer after raft. So, result was Robox printing first layer after raft in the air! Really ugly picture.
I know how to fix it - interface layers + Python script as @miffmaster ‘s to check and lower all ‘real’ layers after interface down to appropriate height. Only question remaining there is how would that look like at the end: first (hopefully interface) layer after raft is going to be a bit ‘undulated’ and cause all above layers to ‘propagate’ ripples resulting in ‘real’ bottom layer ending up not entirely straight. See inside of black box
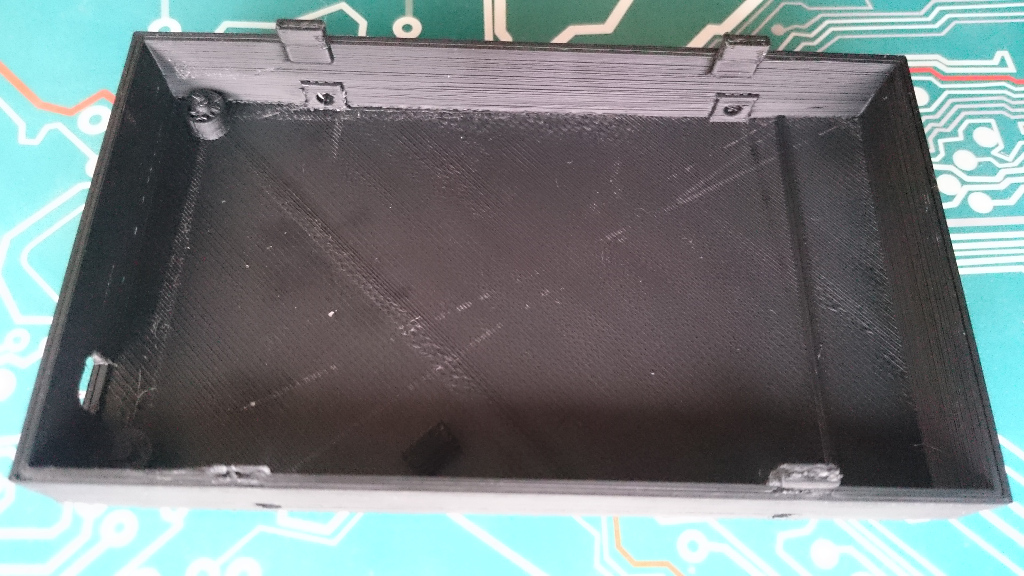
- it smoothed it somehow - but not entirely - and that was after 3-4mm. Any ideas how to overcome that and to print as flat as possible layer which doesn’t rest on the bed?
And last thing is - even then I am not sure if raft is the way forward: you can easily see that box did wrap on edges even though it was at least 5mm (actually, precisely 6.2mm!) above the heating bed.

Has anyone achieved nice and flat bottom without wrapping? Is nylon way forward?
Or maybe printing with circular pads at the corners?
I’ll post more as I learn/try more…

-
This topic was modified 3 years, 3 months ago by
 click.
Attachments:
You must be logged in to view attached files.November 23, 2014 at 2:50 pm #10097Like you, I want to be able to print custom sized abs enclosures, actually this is the main reason for buying the printer.
I’m not sure what you mean when you say ‘circular pads at the corners’, is this to assist in holding the abs flat at this point?
my only other suggestion is to print a thicker base and sand back to flat, hardly ideal though.
my printer should be back with me tomorrow, having managed the sum total of 2 hours printing before I realised that there were serious issues with it. I’ll have a play with some shapes myself, at least my knowledge of 3d modelling is better that my understanding of 3d printing!
November 23, 2014 at 3:31 pm #10098@dmullerdesign “I’m not sure what you mean when you say ‘circular pads at the corners’, is this to assist in holding the abs flat at this point?”
Number 9 from this link: 12 Ways to Fight Warping and Curling
Hope all is fine with your printer now and you’ll continue experimenting. Definitively share here if you manage something more regarding flat bottom side.
Oh, “my only other suggestion is to print a thicker base and sand back to flat, hardly ideal though.” - I am not sure will it work. Check the pictures - they are wrapped quite a bit and wrapping goes on sides as well. Also, I am curious, then, how thick base will affect it: maybe it will wrap even more! Plus, what would be the fill then? 100%? If you sand it too much then you’ll expose inner of the bottom and normally it is just a fill…
November 23, 2014 at 6:06 pm #10101Well, reading through that lot a few things spring to mind and I better understand the mouse ears approach. The things I noted that we could try are:
- print slower (is this possible with a robox?)
- rounded corners on your design
- mouse ears, or circular pads
- less fill
We obviously can’t use the other suggestions of kapton tape, plywood bases and melting the edges with a hot soldering iron(!), smearing the print bed with hot glue prior to printing or misting the abs with acetone and sppraying everything with hairspray. I’m glad about that oddly, they all seem like really bad solutions.
I’ll try a simple, rounded edged box when I get the printer back, that is assuming its printing okay now. Fingers crossed.
November 23, 2014 at 6:54 pm #10102Rounded edges seemed as first next choice to me, but…
I was printing reel for Robox where middle part is completely round and yet it exhibit pretty much same thing 🙁 Sorry I didn’t take pictures of it - I might do it later…
November 23, 2014 at 7:09 pm #10103I might try something like this. Big, wide mouse ear pads and really rounded edges.
Attachments:
You must be logged in to view attached files.November 23, 2014 at 8:22 pm #10107I’ll be eagerly waiting for your findings. In the mean time I have two questions:
How tall mouse ears are going to be and which material you’ll attempt it with first?
November 23, 2014 at 8:30 pm #10109The pads are 20mm diameter, material will be abs (it’s all I’ve got!).
November 24, 2014 at 3:40 am #10118My solution for warping corners is to use T-Glas PETT filament. It is also really strong and very flexible. I only use PLA and ABS to make sure I can print something anymore; parts that get used are all made from T-Glase.
I operate two Betas and four Production Robox.
I am the US/Canada Technical Support engineer for the Robox.
See my 3D Hub site at https://www.3dhubs.com/phoenix/hubs/benNovember 24, 2014 at 8:06 am #10121@bhudson thanks for your suggestion. Does tglase come in an opaque black, is it waterproof and finally, how would a complete beginner go about finding and programming the printer settings.
I like the thought of an alternative material without the inherent curling, shrinking problems of abs but the thought of working out the correct settings in a process of trial and error makes my hair curl. 😉
November 24, 2014 at 11:47 am #10141
AnonymousHave you tried pausing the print about a third of the vertical height in and adding a dab of PVA glue at each corner? I read somewhere that this will stop the corners warping upwards.
November 24, 2014 at 1:37 pm #10168@biscuitlad can you elaborate it or past some links? I am not sure ‘where’ to dab PVA glue on… O: )
-
This topic was modified 3 years, 3 months ago by
-
AuthorPosts
You must be logged in to reply to this topic.

