This topic contains 15 replies, has 5 voices, and was last updated by ![]() click 1 month, 3 weeks ago.
click 1 month, 3 weeks ago.
-
AuthorPosts
-
11/10/2015 at 7:39 am #23137
Has anyone had success with it?
Some time ago (way before raft was an option in AM) I tried to print a case that was supposed to have a flat bottom and while battling warping I tried to do it on a raft. It looked awful!:
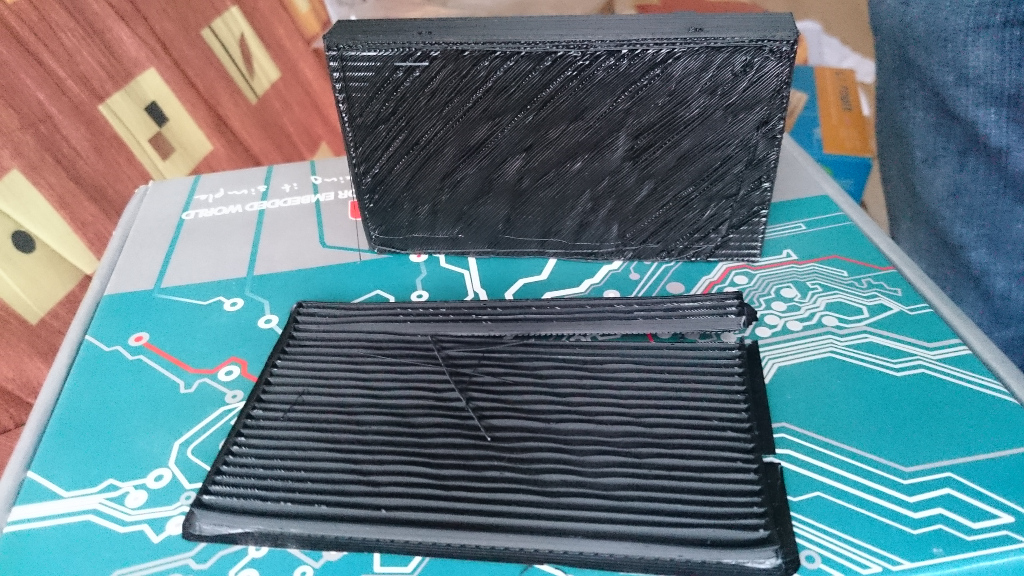
Yesterday a friend sent me stl of a main gear for a model helicopter (Mini Titan if there’s anyone into it) and it was designed to be exact copy of original and that involves some flat surfaces between axle and rim. I printed it with ABS (it was already in the printer for some other reason) + not sure I would print parts that might spin quickly and have with lots of friction with PLA (I’ll definitively redesign it in near future and try polycarbonate filament or even XT instead). Anyway - result is horrendous:
Any idea if it is possible to make passable surface on a raft/support?
-
This topic was modified 1 month, 4 weeks ago by
 click.
Attachments:
You must be logged in to view attached files.11/10/2015 at 9:55 am #23145The problem with the gear is bridging. Support will help a bit, but there is no sensible way for the slicer to evenly create bridges around a circular part. Especially with odd cut outs in the centre. Add to that that the rim is very narrow and therefore there is very little space to anchor the bridges, so they can pull free of the base.
I don’t think you would have much better results on any printer. Although fatter nozzles may help.
In my opinion its best to redesign or modify this part for 3d printing.
The best material for a wearing part like this would be Nylon IMO.
11/10/2015 at 4:38 pm #23150@click I have the same results when using both the raft and support material for curved profiles. I have found that XT is much better than ABS or PLA in these situations and that nylon acts similar to ABS.
This part will be ideal for the dual material head though, as a solid block of support can be printed and then dissolved afterward.
@symon This is something you should take a look at. Eliminates the usefulness of the raft or support material for certain components.
I operate two Betas and one Production Robox.
11/10/2015 at 5:00 pm #23151@hagster redesign is definitively next step - this question is just to confirm that I didn’t miss something obvious

@bhudson Thanks. It is good to know which materials not to try with. Good point about dual material. I’ll give it a go as soon as I get new head - HIPS is already waiting to be fed in separate nozzle.
Also, it seems that to get good support with dual material head slicers should know how to produce solid support. Do you know are they already doing so? And if so, AM would need to know how to utilise it. Alternatively redesign to produce such solid support will be needed…
11/10/2015 at 5:17 pm #23152@click I have noticed that because the Fine profile has a lower layer height, better adhesion to the support material occurs and I get much better results when using support material with the fine profile than with the medium profile. Might be worth a try.
I operate two Betas and one Production Robox.
11/10/2015 at 5:20 pm #23153You can change the support density by changing the support spacing in the advanced menu. You can also change the support pattern. You may find that a denser and alternative pattern helps on this print.
Looking again at the model it looks like there is no possible bridge that can be plotted that doesn’t end on a supported area.
It’s a classic part designed for injection moulding. They indent the middle so that it has a relatively thin profile. Moulds with fat profiles are more likely to distort as they cool or sag in at the centre. This sort of trick is so common that it looks odd when someone designs a part differently.
11/10/2015 at 7:37 pm #2315412/10/2015 at 9:20 am #23167Those internal curves are a pain and placing them on top of support/ interface layers of a raft is always going to be a bit hit and miss due to the spacing of the previous layer.
You could try adding more perimeters so that if some fail it is no big deal.
A redesign of the part will give the best results.
For rafts the Air gap and interface layers will make a big difference, the best setting will depend on the material and layer heights.
 12/10/2015 at 9:29 am #23169
Hi Guys,
When we’ve been testing our soluble supports in house, we’ve been designing solid support into the file - this has given us a lovely finish on our parts when the support is removed. Check out the video of our first disolveable support part here.
@click I have to +1 for redasigning this part for 3D printing here. Decreasing the pattern spacing (as already mentioned) may help and give marginal improvements, but redesigning will get you a perfect part.
S
-
This reply was modified 1 month, 4 weeks ago by
 Simon - CEL.
12/10/2015 at 11:55 am #23179I think those holes did derail the original question.
@siymon I cannot access link you’ve put in there.
12/10/2015 at 12:44 pm #2318112/10/2015 at 5:02 pm #23195Yup. Thanks!
Could you, please, explain what we see there? What is printed with dual head and how?
-
This topic was modified 1 month, 4 weeks ago by
-
AuthorPosts
You must be logged in to reply to this topic.
