RoboxDual › Forums › Show us your bits! › Car interior accessories
This topic contains 13 replies, has 6 voices, and was last updated by ![]() Microcan 6 months ago.
Microcan 6 months ago.
-
AuthorPosts
-
February 23, 2017 at 1:44 pm #37195
Hi all,
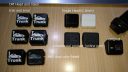
I have used modified trunk button of on-line output until recently but it was simple and simple.
I got DM head and I have trial-and-error with 2-color printing with dual head because I wanted to clearly distinguish the boundaries, but in reality it is quite difficult.
Please look at Button.jpg.I eventually compromised.
Because trunk button are based on black filament and the last few layers are printed in white.
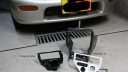
Please look at 4.jpg on upper right.Also, I made my own console panel to install clock, USB and Defi meter controller.
Please look at 1.jpg, 2.jpg, 3.jpg and 4.jpgPhoto 4.jpg is include ABS shift knob.
I want to know the sharp two-color know-how of small parts.
Attachments:
February 23, 2017 at 4:05 pm #37214@taco Your results look good for the DM head due to the larger 0.4 mm nozzle that is used on that head.
I operate two Betas and four Production Robox.
I am the US/Canada Technical Support engineer for the Robox.
See my 3D Hub site at https://www.3dhubs.com/phoenix/hubs/benFebruary 24, 2017 at 3:53 pm #37246Nice work, lots of tricky projects in there.
How about a slider or knob for passengers. Grandma—-|-Ex GF
🙂

For official support please visit www.cel-robox.com/support/ and create a ticketFebruary 24, 2017 at 4:20 pm #37248I just learnt something - that ColorFabb prints nicely whereas ABS smears. I have the same smearing issue on some dual colour prints and thought the issue was the size of the inlays with the second colour, seems not to be the case
Locksmith, software developer, Jaguar fanatic
http://www.247guardian.co.uk/February 24, 2017 at 4:36 pm #37249The nozzle alignment calibration is not so important on a single material setup but is critical on dual material heads. If this and the nozzle opening are correct then you shouldnt get smears unless the material is warping into the path of the nozzles.
For official support please visit www.cel-robox.com/support/ and create a ticketMarch 1, 2017 at 2:04 pm #37353Thanks for comment all.
I tried some approach next follow site tips but my print object was very very small.
I want to get more small head nozzle ;(.https://www.3dhubs.com/talk/thread/printing-dual-colour-text
March 3, 2017 at 12:47 pm #37392the design of those signs is clever, larger lines which are just exposed to appear as small sections are easier to print.
There is no reason why you couldnt print that on a DM Robox. No need for those wipe towers though.
Smaller nozzles will help with XY plane resolution but those details are achieved in Z which you can already easily do.
For official support please visit www.cel-robox.com/support/ and create a ticketMarch 4, 2017 at 3:12 am #37467<span id=”result_box” lang=”en”>Pete Thank you for your comment.
I am operating CELROBOX for about 15 months, but I tried and tried in white monochrome and made using 0.3 mm nozzle with Z axis resolution using white monochrome on the right side of the photo, similarly with 2 color printing It is a picture in the middle that I tested (Speed is done with 0.5 for 2 colors).
Those with two colors are 0.4 mm nozzles, but it makes me feel blurred because of the color mixing.
I made a compromise by dividing white and layers on black with a struggle against the hardship, printing on a flat object with the object flat.
For me, I’d like to print two colors of smaller letters and pictures on the same side, but I really care about mixed colors.
I am glad if there are any good techniques and ideas.</span><span id=”t-served-community-button” class=”trans-verified-button goog-toolbar-button”></span>Attachments:
March 6, 2017 at 2:34 pm #37531it may be nozzle height calibration, perhaps the black nozzle is touching the extruded part of the white nozzle or the other way around.
During height calibration the 2 nozzles are pressed against the bed repeatedly to measure the difference between them.It could also be leaking from one or both nozzles. Try nozzle opening calibration again with those materials loaded.
For official support please visit www.cel-robox.com/support/ and create a ticketMarch 7, 2017 at 2:07 pm #37563Thanks for advice, pete
I will try several calibration and re-print at weekend.March 10, 2017 at 10:12 pm #37657looks great buddy
March 11, 2017 at 5:17 pm #37658@taco Do your letters go into the body of the part or are they just on the surface? If they are just on the surface, the problem is because there isn’t enough material being printed to keep the colors separate. You need to have enough material in each letter to establish the color or it will probably smear as you are seeing. This is very important with small features and dual color and is common with most dual color printers. When you print small letters vertically like you are showing you should have a central body of the same color to establish the color so that you aren’t telling to printer to leave tiny drops of material, which will lead to smearing just like you are seeing.
I operate two Betas and four Production Robox.
I am the US/Canada Technical Support engineer for the Robox.
See my 3D Hub site at https://www.3dhubs.com/phoenix/hubs/ben -
AuthorPosts


You must be logged in to reply to this topic.


